4 Must-Know Pandas Function Application
Transform your data with your function
Transform your data with your function

Pandas is an essential module for Data Scientist, especially for the Pythonist. It makes our life easier by allowing us to store, explore, and manipulate data with a few lines of code. However, there are times when you want to use your function to manage your data. For that reason, I try to write an article to introduce you to some of the attributes we could use for data manipulation with our function.
Here are the four must-know Pandas Function Applications.
1.pipe()
Pandas encouraged us to use a method chaining to manipulate our data. If you did not know what method chaining is, let me show you with an example below.
import pandas as pdimport seaborn as snsmpg = sns.load_dataset('mpg')#Method Chainingmpg.head().info()Method chaining is aa continuous function executed in the same line of code. We use a chain method to decrease the line we write and execute the function faster.
How about if we want to chain our function? Let’s see a simple example below.
#Function to extract the car first name and create a new column called car_first_namedef extract_car_first_name(df): df['car_first_name'] = df['name'].str.split(' ').str.get(0) return df#Function to add my_name after the car_first_name and create a new column called car_and_namedef add_car_my_name(df, my_name = None): df['car_and_name'] = df['car_first_name'] + my_nameadd_car_my_name(extract_car_first_name(mpg), my_name = 'Cornellius')mpg.head()As we can see, we need to execute our function within another function to produce the result. How long it takes to execute these functions?
It takes 18ms to execute a function within a function code. Now, let me introduce you to a chaining method using thepipe attribute below.
mpg.pipe(extract_car_first_name).pipe(add_car_my_name, my_name = 'Cornellius')Method chaining in Pandas object would need the use of the pipe attribute. Each function we want to chain is inputted in the pipe attribute. We can see that the result is similar to the example above. What about the execution time?
Using pipe attribute for method chaining only took 6ms. It is clear that which one is quicker. It might seem it is not much different in the execution time, but imagine if we working with big data. The execution time would play a bigger part. That is why it is advisable to use pipewhen we method chaining of our function.
2.apply()
Previously we talked about the chaining method to the whole dataset, but how about if we want to broadcast our function in a row-wise or column-wise? In this case, we could use the apply attribute. Let me show it using an example below.
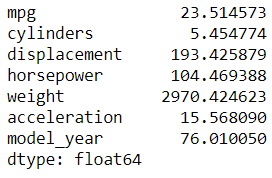
import numpy as np#Selecting only the numerical columns then applying mean function to each columnmpg.select_dtypes('number').apply(np.mean)By default, the function we input in the apply attribute would be broadcasted to each column. The result is series with the column name as the index and the returning value of the function as the series value.
We could create our own function as well. In fact, this is why we use the apply attribute. It is because we could implement our function to transform the data in a column-wise or row-wise. Let me show you the example below.
#Creating a function that accepting the column and return each column mean divided by 2def mean_divided_by_2(col): return (col.mean())/2mpg.select_dtypes('number').apply(mean_divided_by_2)Using my own function, I get a result of each column mean divided by two. If you realize, the function that I create is accepting one parameter I called col. With this col parameter, I return the mean of each column by using the meanattribute. This means the function that we created for the apply attribute would accepting a series object of each column. That way, we could use any of the series methods in our own function.
How about a row-wise application? yes, we could apply our function to the dataset in a row-wise manner. Let me show you by a simple example below.
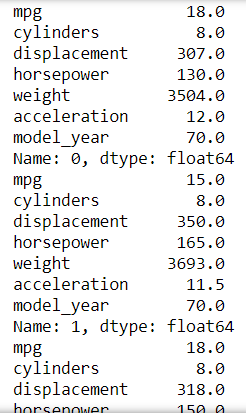
#Using print function and change the axis parameter to 1 in order for a row-wise applicationmpg.select_dtypes('number').apply(print, axis =1)We could see from the result that we are printing each row of the data where each row is transformed into a series object. The series index is the column name, the series value is the value in each row, and the series name is the index name of each row.
Just like before, we could create our own function. Let me show you an example below.
#Creating a classification function. If the mpg is below 18 and the model_year below 75 it would return Old-School, else it would return New-Schooldef mpg_classification(cols): if cols['mpg'] <18 and cols['model_year'] <75: return 'Old-School' else: return 'New-School'#Creating a new column called Classification by using the mpg_classification function input on apply attributempg['Classification'] = mpg.apply(mpg_classification, axis = 1)mpg.head()As you can see, we now have a new column called Classification. The values are based on the mpg_classification function we used in the apply attribute. In the case of row-wise, we iterate in each row so the function we input is applied in each row. Each iteration is a series object consists of the row values with the index is the column name. In my function above, the cols parameter would be filled by the series object of each row; that is why I specified which column I use in the cols parameter(cols[‘mpg’] and cols[‘model_year’]).
3. agg()
The aggregationor agg allows one to express possibly multiple aggregation operations in a single concise way. For you who did not know what aggregation is, let me just show you with an example below.
mpg.agg(np.mean)Aggregation using one function is similar to the apply attribute we use before. It applying a function to each column and produce a series object. What makesagg special is how it could take multiple functions.
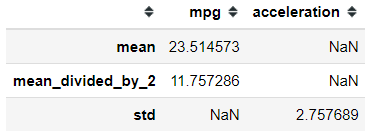
#Instead of function, agg could receive the string of the basic statistic function. Additionaly, we could implement our own function here as well. If we have multiple function, we put it in the list.mpg.agg(['mean', 'std',mean_divided_by_2])With multiple functions as an input, we get a Data Frame object. What is great about agg attribute is that the function only applied to the valid object. If the function we input cannot accept certain data types, it would be ignored.
Passing a dictionary object to the agg attribute allows us to specify which function is applied to what column.
#For example, I only use mpg and acceleration column. If we pass dictionary to the agg attribute, we need to specify the function we want to every column.mpg[['mpg', 'acceleration']].agg({'mpg': ['mean',mean_divided_by_2], 'acceleration': 'std'})4. applymap()
All the attributes we learned previously is based on the whole dataset or column/row-wise. How about if we want to apply the function only to each element or value? in this case, we would use the applymap attribute. Let me show you an example below.
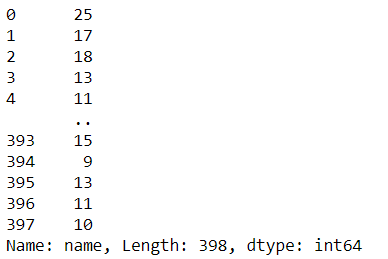
#You could input a lambda function as well. Here I create a function to transform each value into string object and return the length of the stringmpg.applymap(lambda x: len(str(x)))The result is a Data Frame object where the function we input to the applymap is applied to each value in the dataset. We also have map attribute for the series object that is equivalent to the Data Frame applymap attribute.
#Using map attribute on the series objectmpg['name'].apply(lambda x: len(str(x)))Conclusion
In this article, I have shown you four Pandas Function Application that prove to be useful in our everyday Data Science work. They are:
pipe
apply
agg
applymap
I hope it helps!


