Easy Model Building with PerceptiLabs — Interactive TensorFlowVisualization GUI
Improve your machine learning modeling experience with this package
Improve your machine learning modeling experience with this package
As a Data Scientist, creating a machine learning model is our daily job. Whether used to predict a simple thing such as house price or a much more glorified AI like image recognition, we often need to code it from scratch.
The more painful thing is keeping track of what happens in our machine learning modeling process and the result of our modeling. If you are someone like me, you might have a hundred to thousands of code in different cells in your Jupyter notebook.
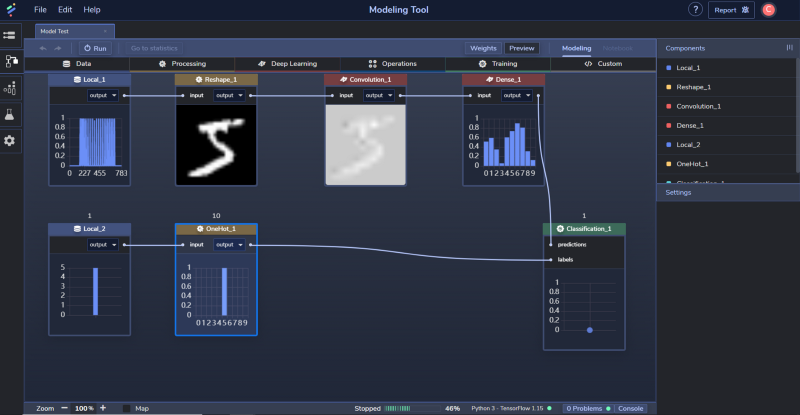
In this case, I found out about this amazing interactive drag-and-drop GUI model building free package called Perceptilabs. This free package wraps TensorFlow code to create the visual components, allowing users to visualize the model architecture as the model is being built.
Below is the Modeling Tool GUI screenshot from Perceptilabs.
The way the model-building works is by drag-and-drop everything; from the data, the layer and the target do not need any coding part.
You who have experience with Cloud providers such as AWS or Azure might feel familiar with the process and the features offered by Perceptilabs. Nevertheless, the features present in Perceptilabs are still easy to understand even if you did not have the experience.
In this article, I want to present to you how to work with Perceptilabs and what part Iike. Let’s get into it.
Perceptilabs
Installation and login
To start our journey with Perceptilabs, we need to install the package first. You can install it by running the following code on your CLI.
pip install perceptilabsWhile it is fine to install the package directly to your environment, it is recommended to use the virtual environment when testing the package. If you are not sure what is a virtual environment, you could check it out in my other article.
Creating and Using Virtual Environment on Jupyter Notebook with Python
Creating an isolation environment for your sandbox data science experimenttowardsdatascience.com
After the installation finish, you could run the package by typing perceptilabs in the CLI. Just run in like the following code.
perceptilabsYou should see something like the image above on your CLI when you run the code. In your browser, there should be a new tab shown up where you need to log in.
It is recommended to log in with your GitHub account because you could track your GitHub model creation.
Model building
When you have login successfully, you could see the Model Hub, which looks like the image below.
This is the part where we would create our machine learning model. Try to click the “Create” button, which would show us another selection.
In this section, Perceptilabs have many pre-made templates to choose from. Based on your project needs, you could choose the Empty templates in our case. Just like the description said, choosing the empty templates means we would create the model from scratch. When you have chosen the template, it will switch to another section to build our model.
Building our model is really simple; you only need to select the data and the process you want then we are ready to train your model. Let’s try building the image recognition model by using the in-built MNSIT Dataset.
If you want to skip all the explanations, you can follow my GIF below.
If you decide to follow my steps, let me breakdown the steps in simple ways. First, let’s select our training data by clicking the Data tab. On that tab, choose the Local selection to acquire the data from the local environment.
With the local component showing up, you could load the data by choosing the ‘Load Data’ button in the setting section on your right. In this selection, you could choose where your data came from, mostly from your local computer but for this practice, let’s choose the ‘classification_mnist_input.npy’ from the tutorial folder.
Next, let’s Reshape the data into more acceptable data for machine learning processing. We could do this by selecting the Processing tab and choose Reshape.
There are currently only four different processing options, but it is enough for a simple model building. Next, you want to drag the white line next to the Local output into the Reshape input. This is what we did to make sure the training data from our local source are Reshaped.
From here, we are ready to take the data into the Deep Learning process. To do this, we select the Deep Learning tab and choose the Convolution selection.
If there is anything that you want to change regarding the layer parameter, you could do that in the setting. Just adjust it with your necessity.
In the next step, I would add the Dense layer from the Deep Learning tab. With this, our model architecture would look like the image below.
This is our simple image classifier with Convolutional and Dense layer. To complete the machine learning process, we need to train it with the labels.
Let’s add another Local component and load the ‘classification_mnist_label.npy’.
For the next processing, let’s One Hot Encode our Label data using the OneHot from the Processing tab.
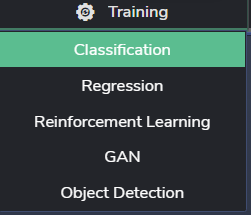
Lastly, we would build an image classifier; we would choose the Classification from the Training Tab.
After we connect all the necessary components, we are done building our machine learning model architecture. The whole map should look like the image below.
We only need to click the Run button to start the whole learning process with all components present. If you still want to explore all the possibilities by tweaking the setting or add more components, please do so.
I really like the Perceptilabs process as it is a simple but insightful process as we build our model. It might slightly lose the whole modeling process's flexibility, but we offered an easier platform to track our model in exchange. Moreover, there is a debugging process where we can process the error swiftly.
If you are curious about the coding, you could view the whole modeling code by clicking the Notebook button.
If you only care about the single component code, you could select the section's component in the setting section click the Open Code button.
If you have finished tweaking all the settings, we could start running the modeling process by clicking the run button.
Statistic and Validation
When running the modeling process, you automatically switch into the Statistic section to see all the prediction metrics.
I personally appreciate this feature to select the different metrics' tabs to show how the metrics progress over the epochs. I am the type who loves to see the numbers, after all. It might not have all the available prediction metrics out there, but it is good enough for the moment.
If you select the flask button under the statistic Tab, we will end up in the Test tab. In this tab, we can validate our model using the sample data.
Exporting Model
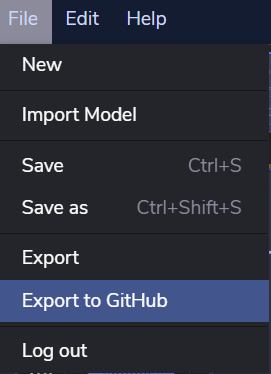
When you already feel comfortable and sure with the model, you can select from the File drop-down to export your model. Either Export it normally into a JSON file or Jupyter Notebook to your local computer or Export everything to GitHub. You could do it by selecting the File drop-down.
In my case, I want to try exporting it to my GitHub page as I am interested in how is it works.
The process is quick and simple. When the export process is done, the model is exported to our GitHub. If you want to see the model I create for this Tutorial, check it on this page.
Conclusion
Perceptilabs is a great package you could use to improve your experience in creating TensorFlow based machine learning model. The interactive and insightful GUI are present to make your life easier when creating the model.
The model building is as simple as drag-and-drop the necessary components and clicking the run button to processing the machine learning model. All the processes are tracked and debugged in each step to ensure you know where the error is.
When you have the model, you could export it to your local folder or GitHub when you need the machine learning model for other purposes.
I am overall enjoy using Perceptilabs to create my machine learning model. The components might still be limited and less flexible than the hard coding, but I am sure it would improve over time.


